HOW TO OVERWINTER DAHLIAS
Dahlias really shine in late summer and fall. They fill our gardens and vases with beautiful blooms long after most other flowers have faded. When cold weather arrives, it's always hard to say goodbye to such generous plants.
At the end of the growing season, you can either treat your dahlias as annuals and plant a fresh batch of tubers next spring, or save the tubers from the varieties you really like and grow them again next year. Overwintering dahlias is easier than you might think. Read on for some easy, step-by-step instructions.
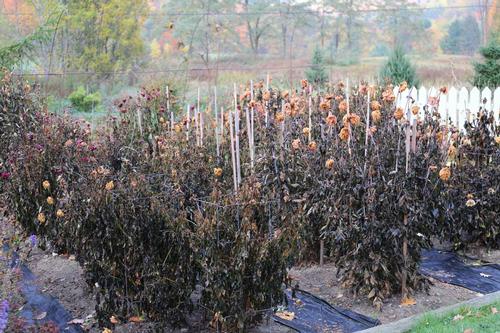
Dahlias are are warm weather plants and their foliage will not tolerate freezing temperatures. The first heavy frost will turn flowers, stems and leaves to black. Though the dahlia plants in the photo look dead, they’re not. Frost has killed everything above ground, but the soil is still warm and has protected the bulbs from freezing.
If you live in hardiness zones 8-10, where winter temperatures rarely fall below 20° F, you may leave your dahlia tubers right in the ground. Simply cut the plants back to several inches above soil level. They will start growing again in spring.

In hardiness zone 7, dahlias will usually survive the winter outdoors as long if the soil is well drained and the tubers are insulated with a thick layer of mulch. To avoid any risk, bring the tubers indoors, following the instructions for colder zones.
If you garden in zones 3-6, you'll need to dig up your dahlia bulbs and store them indoors. For this task you need pruning shears, a shovel or digging fork, survey tape and marker, damp growing mix, and either big nursery pots, black plastic trash bags or large boxes. Here's how to do it:

1. LABEL. Start by labeling the plants you want to keep, saving only the varieties that are healthy and that really impressed you. Do this BEFORE you get a frost, while you can still evaluate the plant and see the flowers. Regular plant labels are easily lost over the winter. Survey tape and a waterproof marker is a better alternative. Write the name on the tape, then tie it securely around the base of each plant you plan to dig up and store indoors.
2. CUT BACK. After the first hard frost, it's best to leave the tubers in the ground for a week or two. This helps toughen their skins, but isn't essential. Cut back all the stems to within 4” of the ground. Re-tie the labels as needed to ensure they are securely attached. If your dahlias are in containers, skip down to number 6 below.
3. DIG. Dig up each root ball, starting at least a foot away from the stem. Depending on the size of the plant, the root ball may be 12” to 30” across and as much as 18” deep. Go slowly and be gentle, as the tubers are extremely brittle. Damaged tubers are more susceptible to decay.
4. DRY. If possible, let the clumps air dry for a day or two, protected from direct sun and frost. Tubers may be divided at this point, or you can wait and do it later (including in the spring). If you plan to divide your tubers in the spring, there's no need to wash soil off the clumps. Just store the entire root ball as it came out of the ground. If you want to divide the tubers now (it will save on space if that's an issue) see below for dividing instructions.
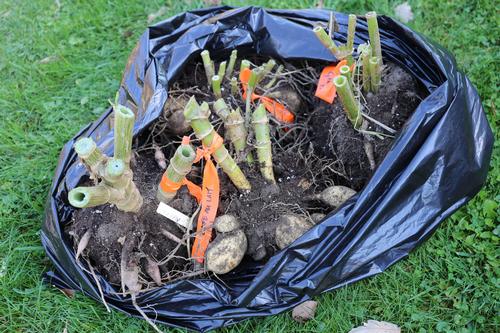
5. PACK. The root balls may be stored in several ways. You can plant them into large nursery pots with damp potting soil. Or store them in ventilated cardboard boxes or plastic tubs that are partially filled with damp growing mix, peat moss or vermiculite. Another option is to store several clumps together in a large black plastic trash bag. Don't seal the bag, just loosely gather the top so moisture stays in, but there's still some air circulation.
6. STORE. Store the pots, boxes or bags in a cool, dark, humid place where the temperature will stay between 40 and 50 degrees F. An unheated basement is ideal. In zones 5 and 6 you may be able to keep them in an attached garage. Just make sure the tubers don't freeze. A frozen tuber is a dead tuber.
7. CHECK. Check on your dahlias periodically through the winter. If storage conditions are too moist, you may get some mushy tubers. Remove them and increase ventilation to reduce the moisture level. If the tubers are wrinkled and dry, mist them or add some damp growing mix to help them rehydrate.
When spring arrives, go through all of your saved dahlias and discard any tubers that are soft or completely dried out. Then it's time to start dividing the root balls into manageable-sized clumps. If you want to handle and replant an entire clump, go ahead. Otherwise, read on.
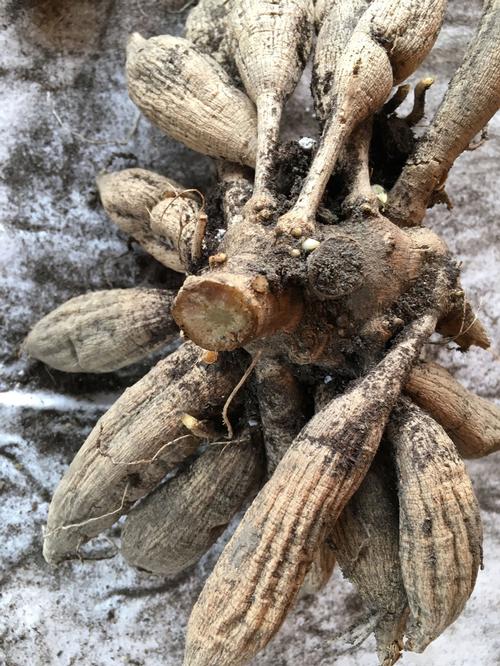
When dividing a clump of dahlia tubers, every division must include one or more growth eyes. These occur in a very specific location. In the photo, you may be able to see how the eyes are clustered on the knobby part where the tuber meets the stem. If you plant a tuber that does not have an eye, it will not grow.
It takes practice to be able to see the eyes. If you wait until early spring to do the dividing, some of the eyes may start to sprout. This makes it easier to see where to make the cuts. To be on the safe side, you can simply divide large root balls into halves or quarters. Cut down through the stem, making sure to leave some of last year’s stem attached to each new clump.
To learn more, read Dahlia Tubers: What You Need to Know, and watch bulb expert Hans Langeveld in this video: How to Lift and Store Dahlias. For more information about growing dahlias, you may be interested in reading: All About Dahlias, How to Pinch and Stake Dahlias, and Dahlias: 8 Great Looks.